4. Configuring caching
When it comes to caching your website or web application's content, Fastly provides a wide variety of options. Fastly caches most content by default, but many people will want or need to customize their caching settings. You have complete control over what content is cached, and for how long that content is cached.
There's no one-size-fits-all approach to caching — everyone's needs can be slightly different. In a real world scenario, your caching requirements will depend on a variety of factors. For example, if you used Django to build your web application, you might want to create different caching rules for static and dynamic content.
Since Taco Labs is a static website, our caching needs are relatively simple. Our recipe website primarily contains HTML and images. The goal is to cache everything for a long time. Then, when we make a change, we'll purge the impacted URL or just do a purge all.
TIP: It probably goes without saying that caching is an enormous topic that can't be comprehensively covered in this tutorial. To learn more about caching, see our caching documentation.
How caching and purging works with our workflow
Let's consider how and when we'll need to purge content from cache. There are three possible scenarios:
- Adding new content
- Revising content
- Deleting content
The revising and deleting content scenarios should be obvious. If we revise a single recipe, we can soft purge the URLs of the page and any associated images. Deleting content is a bit more complicated. Obviously, we'll need to purge the URL of the deleted page and any associated images. We'll also need to purge any of the index pages that link to the deleted page.
New content isn't cached, of course. But even adding new content isn't a straightforward matter. New recipes will appear on the category index pages, and since those pages are cached, they'll need to be purged when the new content is added.
To keep things simple, we'll update our GitHub Action in the next section to use the Fastly API to automatically purge all content after we build and deploy our website to Amazon S3. Purge all is not the most efficient way of purging content — you definitely wouldn't want to do this if you were, say, managing a content management system that receives hundreds of thousands of visitors a day. But for our static site, this setup reduces complexity and makes it easier for team members to handle deployments.
Setting caching headers
We can set HTTP headers that control caching for both Fastly's servers and end users' web browsers. There are several relevant headers available — for a full list, see our documentation on HTTP caching semantics. We'll use the Surrogate-Control and Cache-Control headers for Taco Labs:
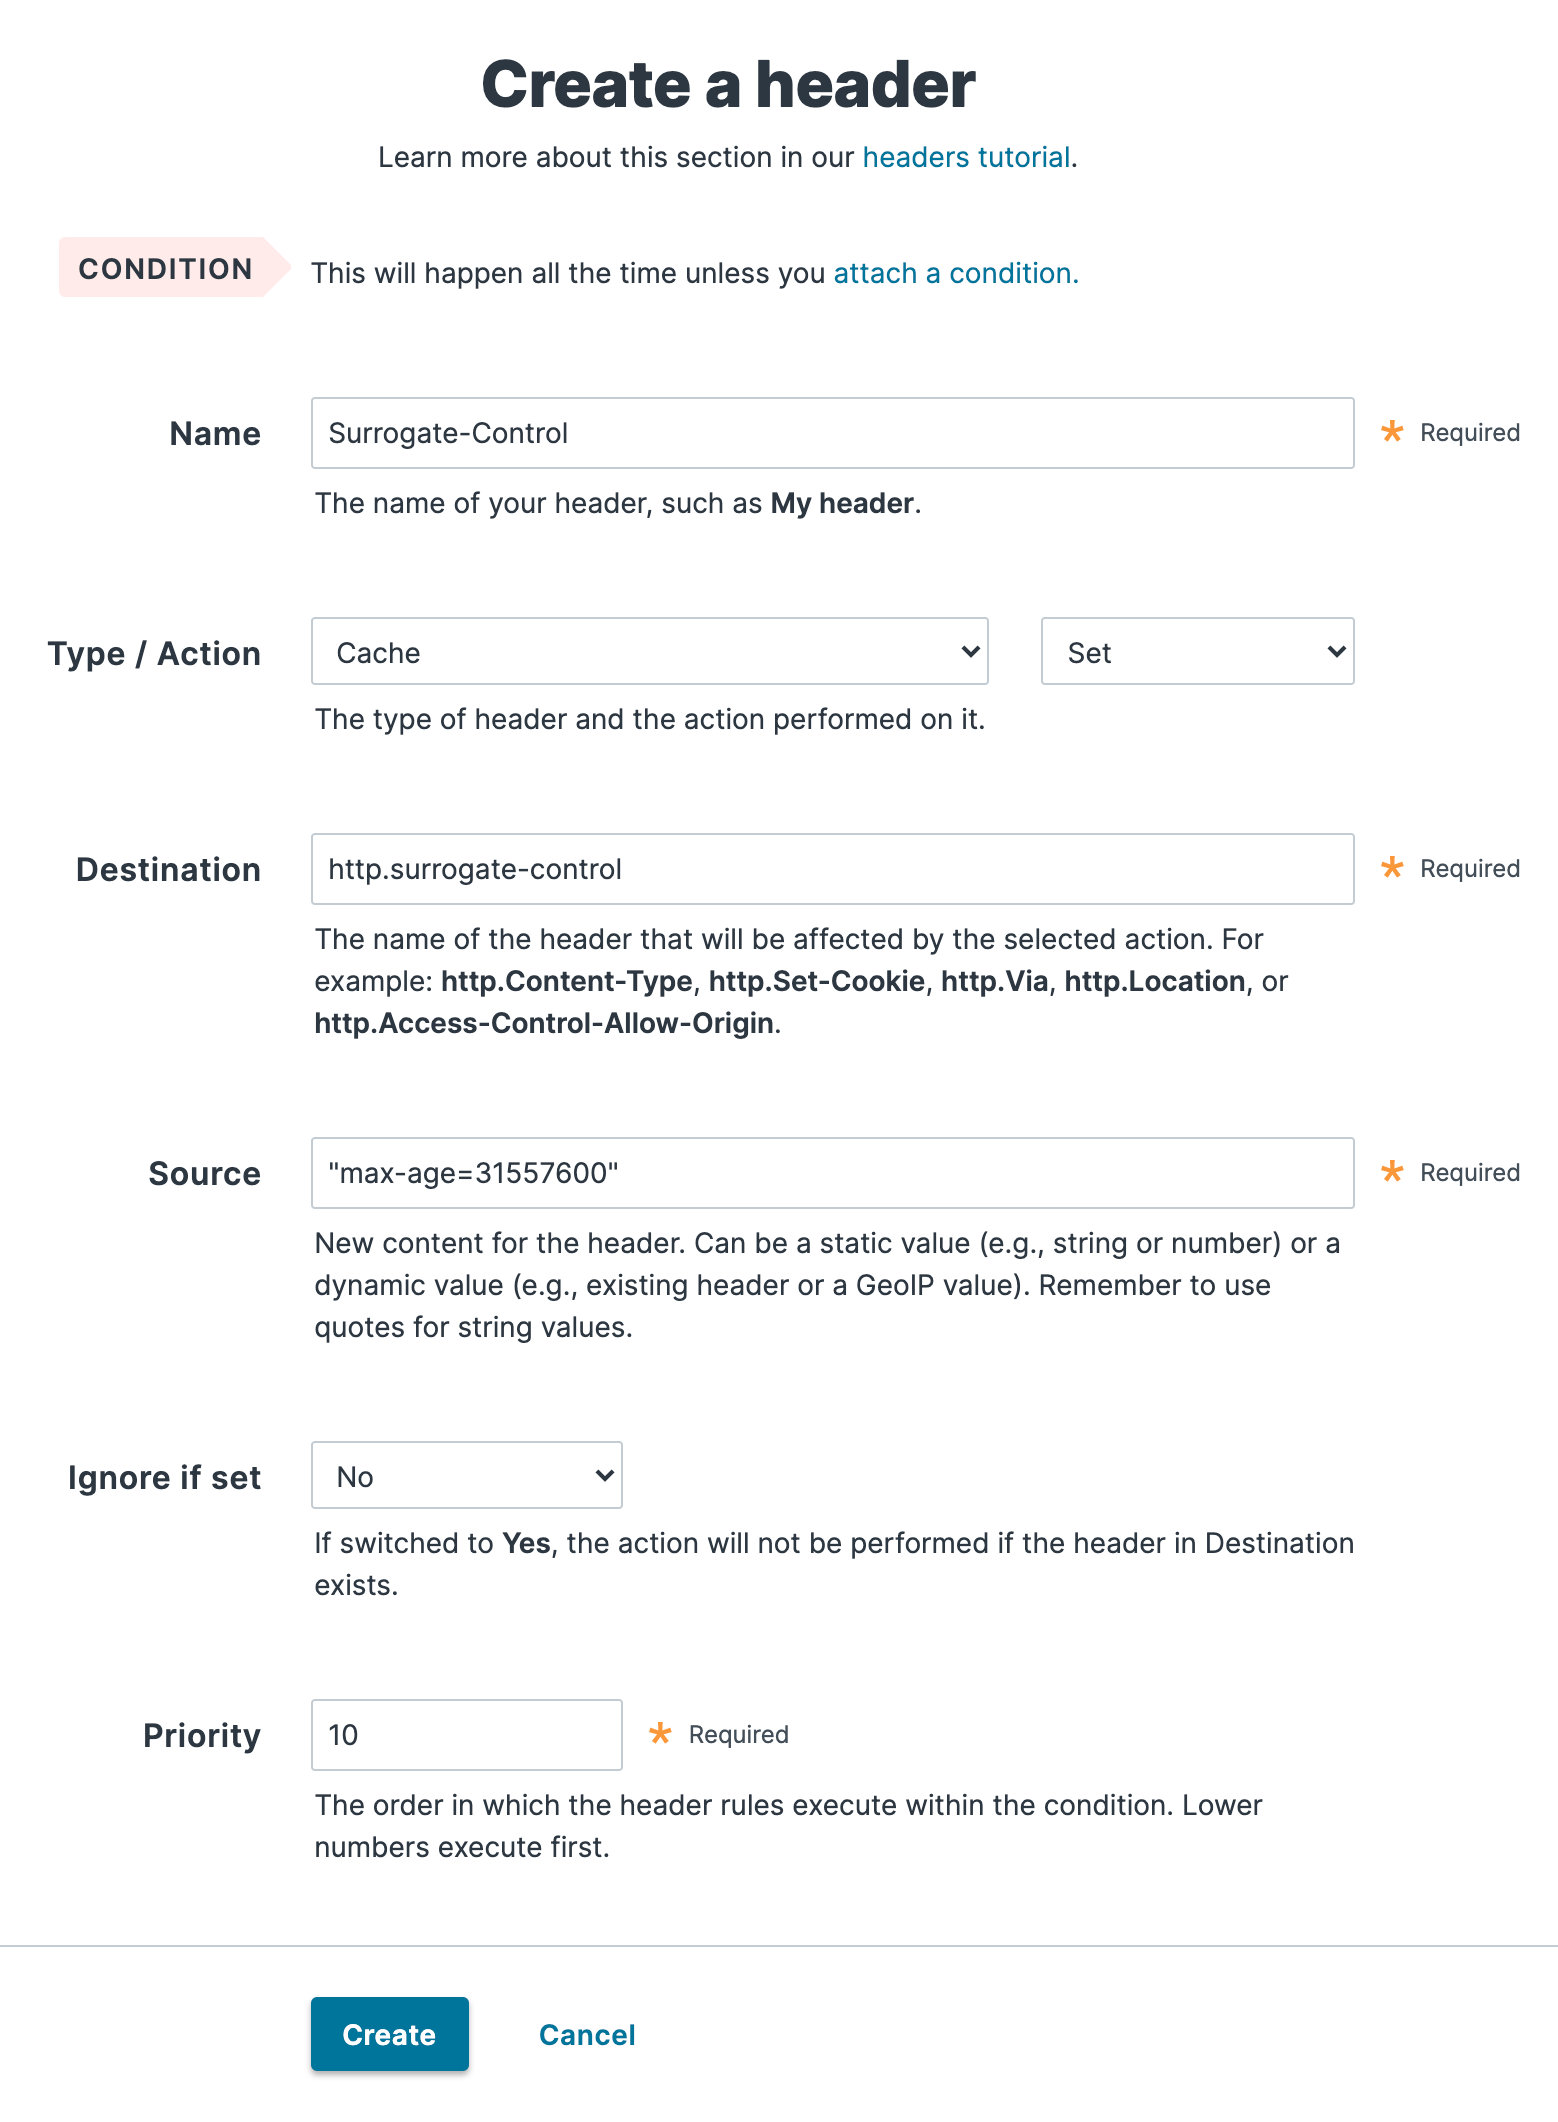
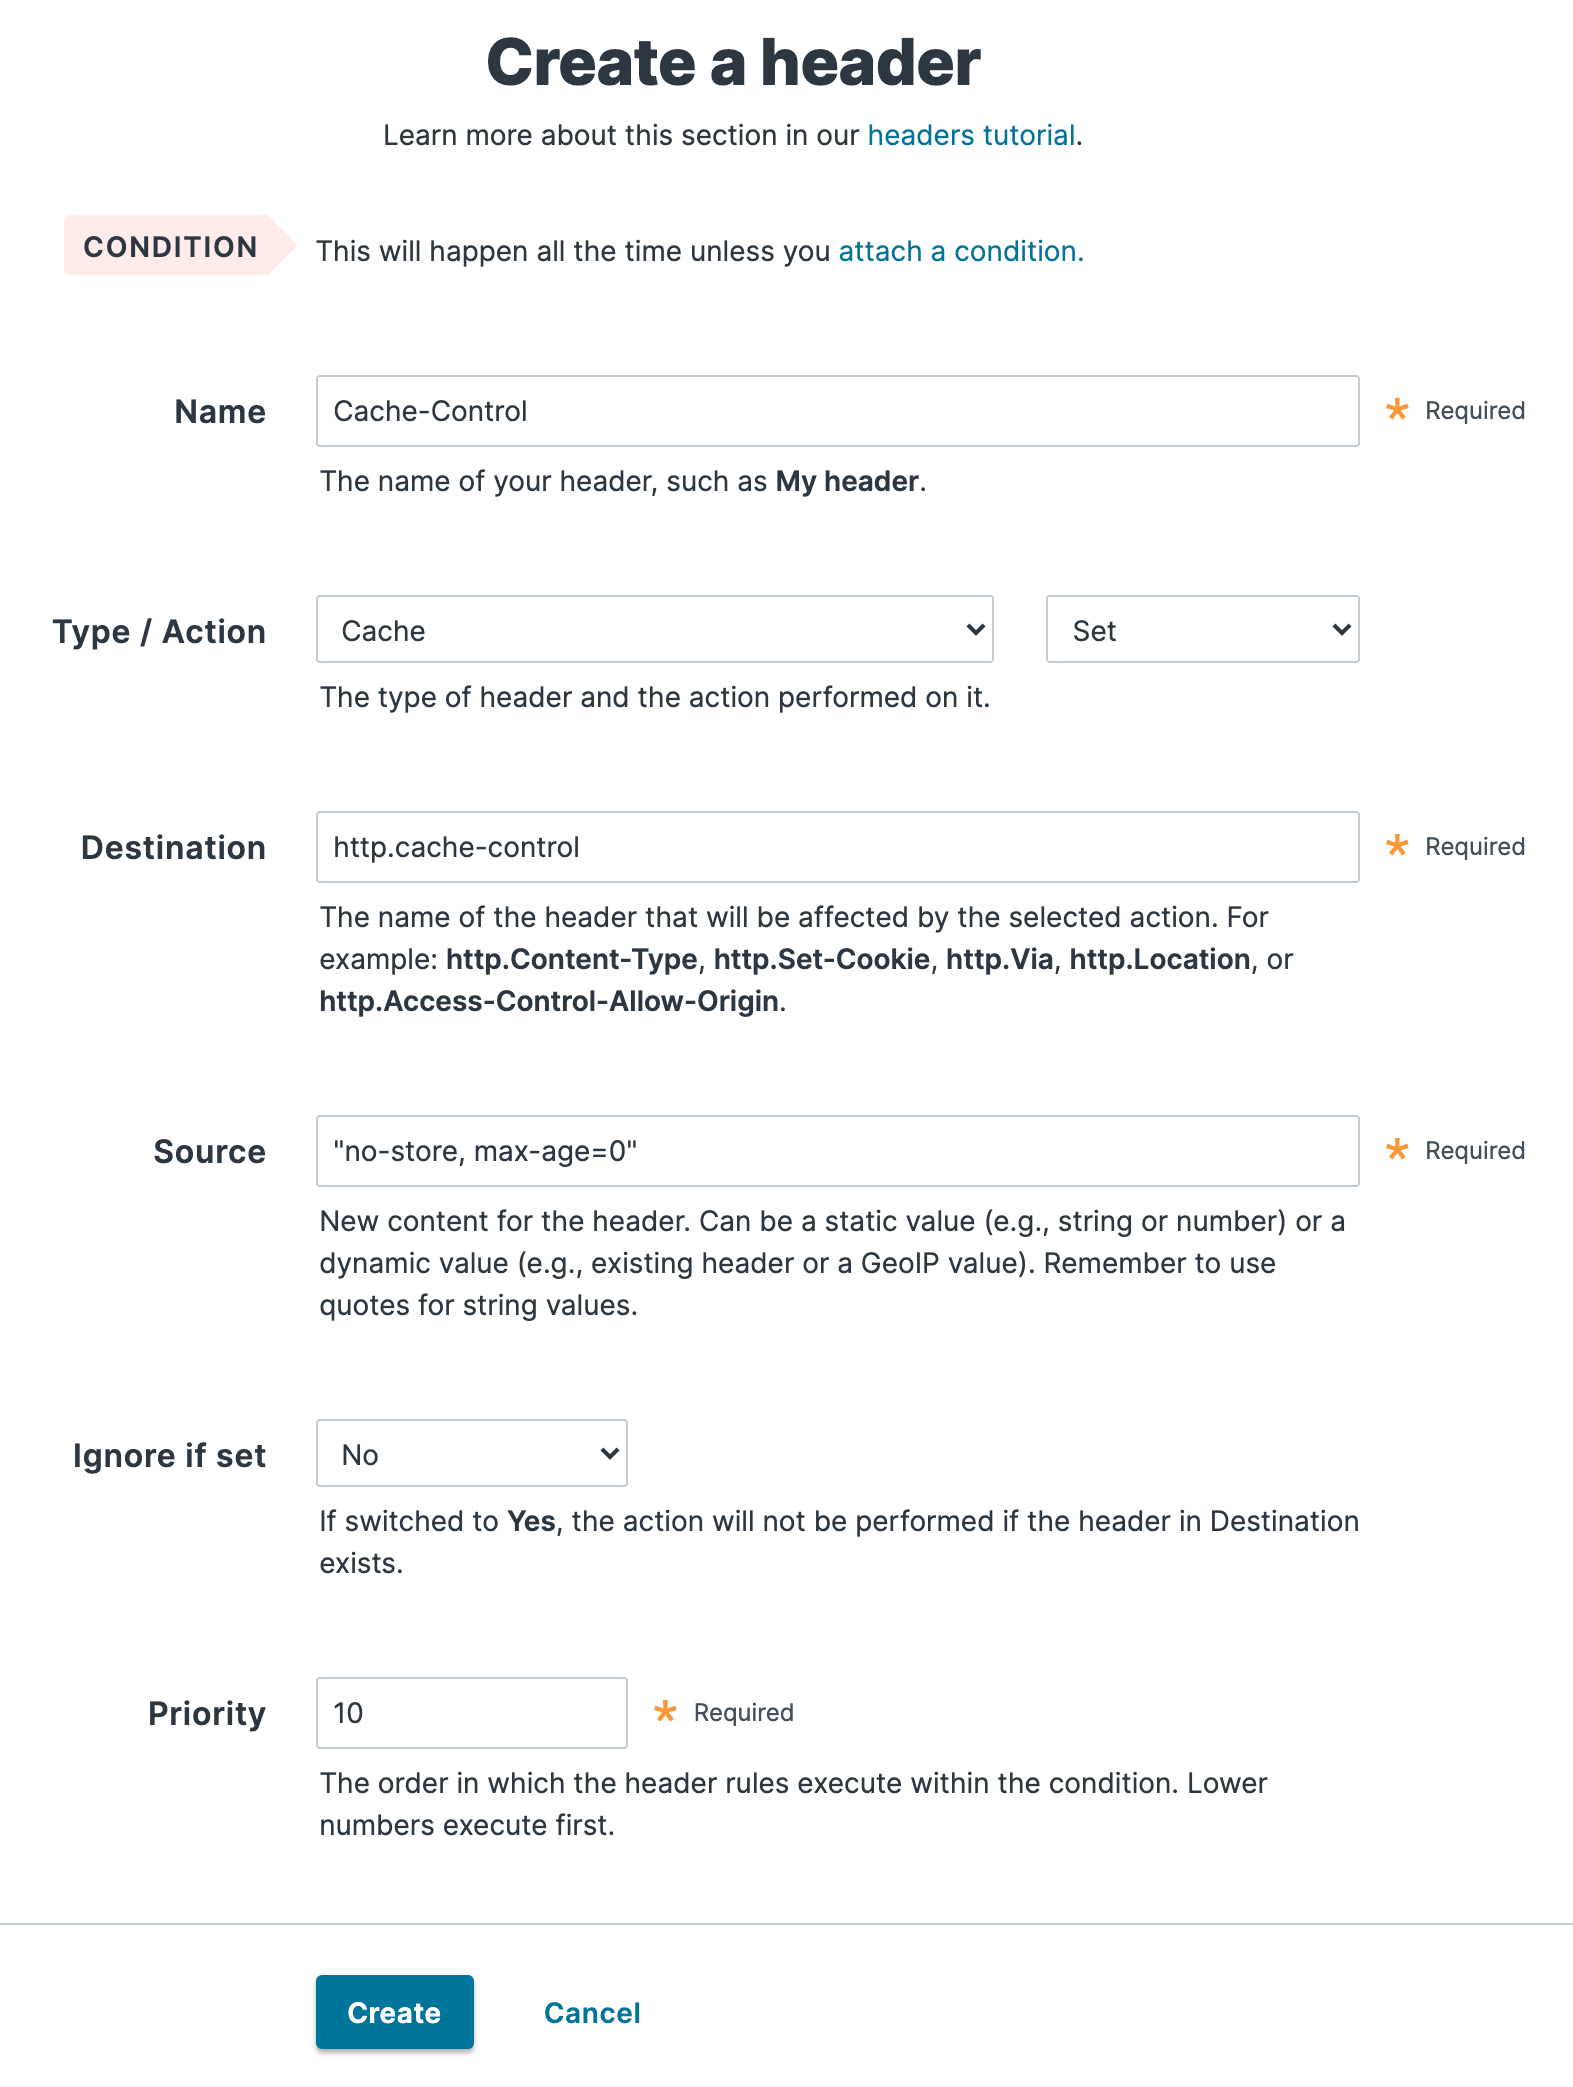
Surrogate-Control: max-age=31557600Cache-Control: no-store, max-age=0The Surrogate-Control header is proprietary to Fastly. Here, it's telling Fastly to cache objects for a maximum of 31557600 seconds (one year). We might go weeks or months without updating the existing content on Taco Labs — this header ensures that our content will stay in Fastly's cache for a long time.
On the other hand, we don't really care about caching in the end user's web browser. In fact, we'd prefer not to since Fastly can't invalidate an end user's web browser cache. Purge requests clear Fastly's cache, but they don't touch web browsers. That's where the Cache-Control header comes in. We can use it to tell the user's web browser to not cache the object.
Acting together, these headers tell Fastly's servers to cache objects for a year and end users' web browsers to not cache objects at all.
NOTE: If we wanted to leverage web browser cache in this example, we could set the Cache-Control header to something like max-age=86400. That way, the end user's web browser would cache objects for up to a day.
We can set the headers in the Fastly web interface. Let's start with the Surrogate-Control header. Click Edit configuration to clone our service and create a new draft version. Then, on the Content page, click Create a header. We'll fill out the form fields as shown below.

Let's click Create to save the header. Next, we'll click Create a header to create the Cache-Control header. We'll fill out the form fields as shown below.

We'll click Create to save the header, and then select Activate on Production from the Activate menu to activate our service configuration.
After performing another purge all (follow the instructions from the previous section), our new headers should be live. We can check by using the following curl command:
$ curl -svo /dev/null -H "Fastly-Debug:1" https://tacolabs.global.ssl.fastly.netThe output should contain the following:
< HTTP/2 200< x-amz-id-2: i0l9PThu7fvjt4FVKxtZYOVHEKAJIPh/rp9bjojQI+WXPFUKPW6WJZ7a4V0Pq3pyaR0VAvE/g5E=< x-amz-request-id: 2XK0VGXYP9TWDW3J< last-modified: Fri, 23 Jul 2021 21:54:38 GMT< etag: "dcf9e4efa41b023a4280c8305070a1cf"< content-type: text/html< server: AmazonS3< via: 1.1 varnish, 1.1 varnish< cache-control: no-store, max-age=0< accept-ranges: bytes< date: Tue, 26 Oct 2021 21:21:11 GMT< age: 85457< x-served-by: cache-mdw17340-MDW, cache-phx12433-PHX< x-cache: HIT, MISS< x-cache-hits: 2, 0< x-timer: S1635283271.482635,VS0,VE46< vary: Accept-Encoding< content-length: 4469We can see our Cache-Control header there in the output. It's working! Note that we don't see the Surrogate-Control header in the output because Fastly removes that header before a response is sent to an end user.
Enabling serve stale
Fastly can serve stale content when there's a problem with our origin server or if it's taking a long time to fetch new content from our origin server. For example, in the unlikely event that Amazon S3 has a service disruption, Fastly can continue to serve cached content from Taco Labs. This can help mitigate origin server outages — the only catch is that we have to enable it before our origin server goes down.
Let's click Edit configuration to clone our service and create a new draft version. Then, on the Settings page, click the On switch next to Serve stale content on origin failure, as shown below.

Now we can select Activate on Production from the Activate menu to activate our service configuration. We're all set! Now if Amazon S3 ever goes offline, Fastly will continue serving Taco Labs to visitors.
If you're interested in customizing the settings for this feature, be sure to read through the serve stale content documentation. There's a lot more you can do.
Preventing a page from caching
By default, Fastly will cache all of the objects on the Taco Labs website, but we can create a condition to prevent certain objects from being cached. There are situations where this could be useful. For example, maybe the images in your content management system are constantly being updated and you'd rather not cache them. Or maybe you want to add real-time interactive elements to a single page. Whatever the case, it's nice knowing that you can update your service configuration to prevent things from being cached.
TIP: Conditions logically control how requests are processed. They're really powerful! We encourage you to read more about conditions.
In this particular example, we'll prevent the caching of one of our recipe index pages (http://www.tacolabs.com/tacos/). Let's pretend that we're interested in adding some real-time information to this page in the form of two widgets: One that shows how many times our taco recipes have been viewed, and another that shows how many tacos have been eaten at a certain restaurant in Albuquerque. By conditionally preventing the page from being cached, we can ensure that visitors will always see the most up-to-date information.
We can set this up in the web interface. First, we'll create a new cache setting that tells Fastly which page not to cache. Then, we'll create a new condition that tells Fastly when to use the cache setting.
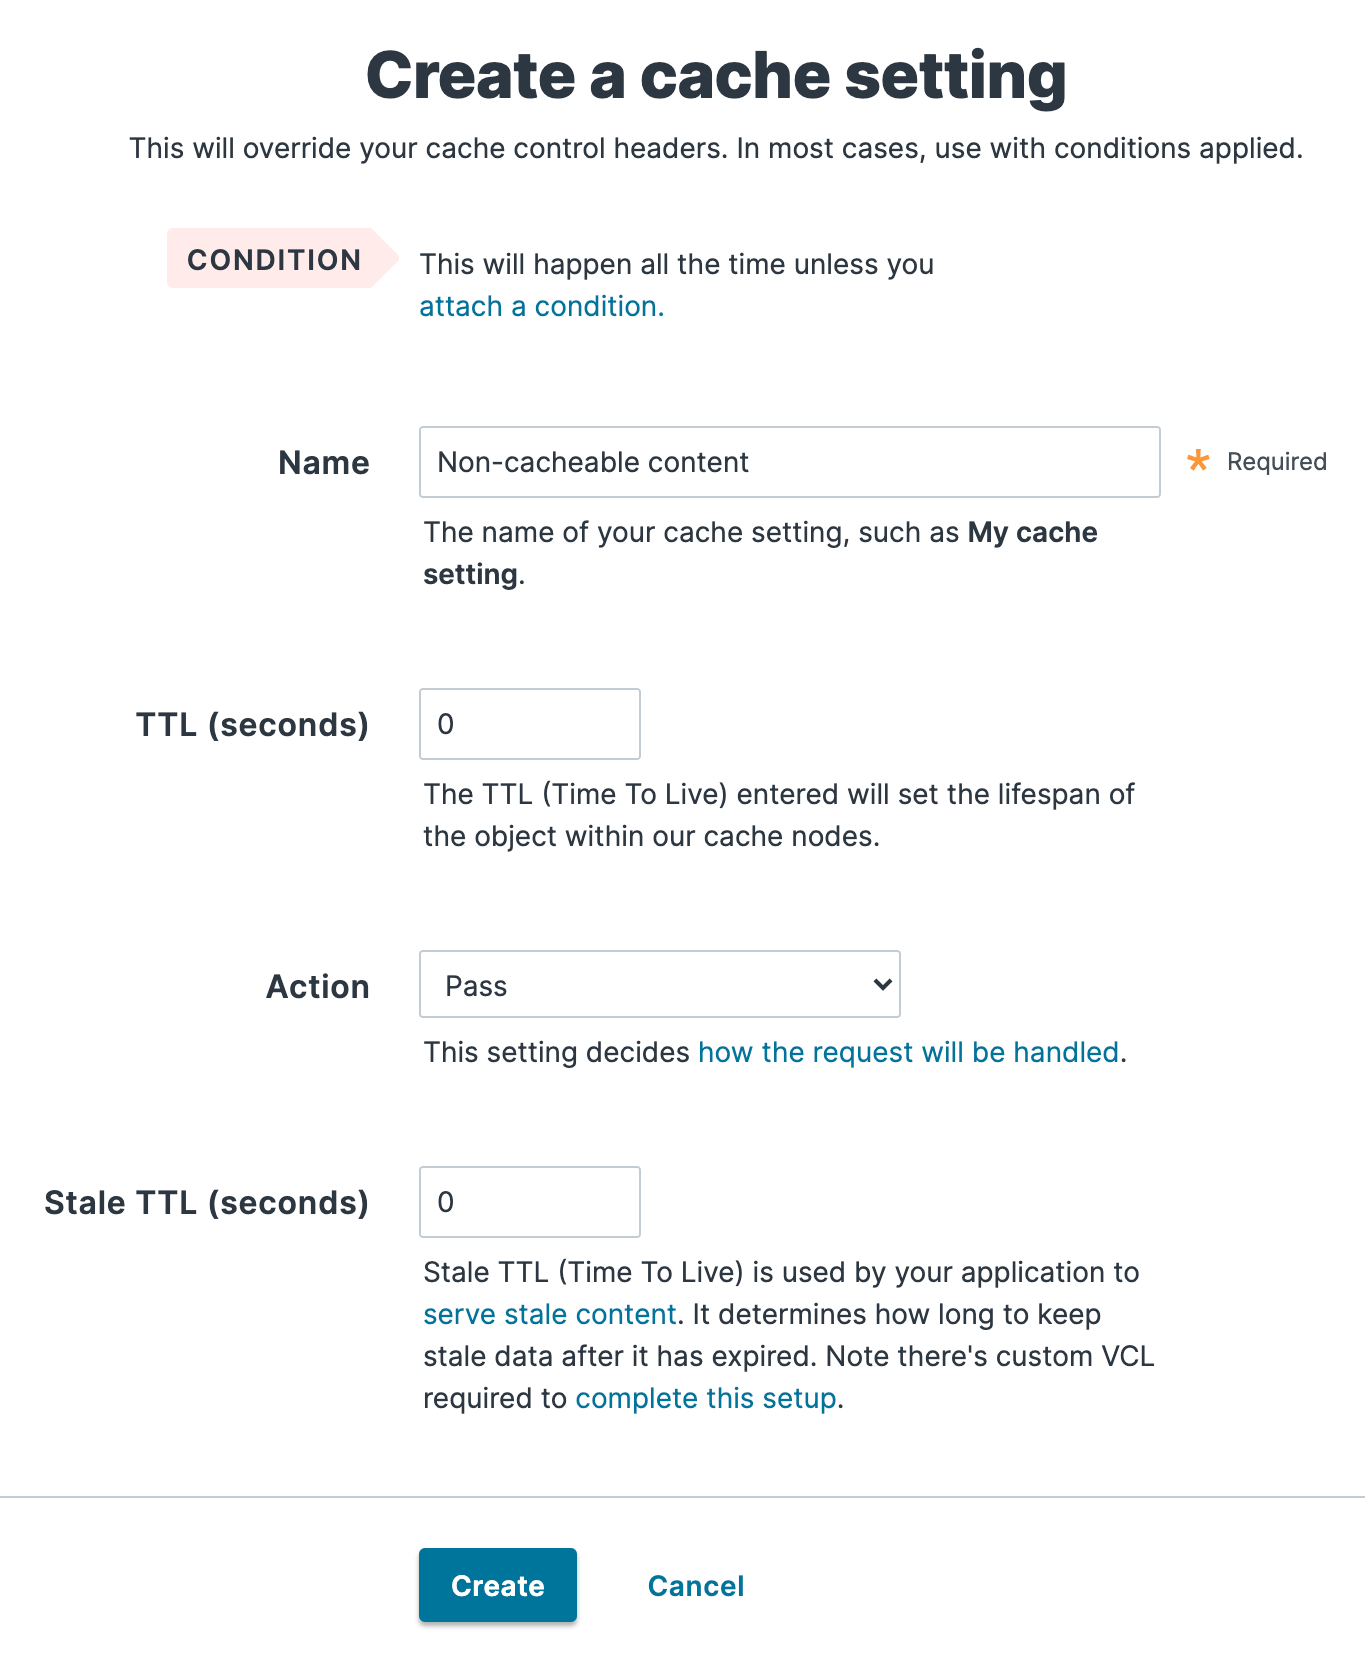
Let's click Edit configuration to clone our service and create a new draft version. Then, on the Settings page, click Create cache setting. Fill out the fields as shown below. Make sure that you set Action to Pass.

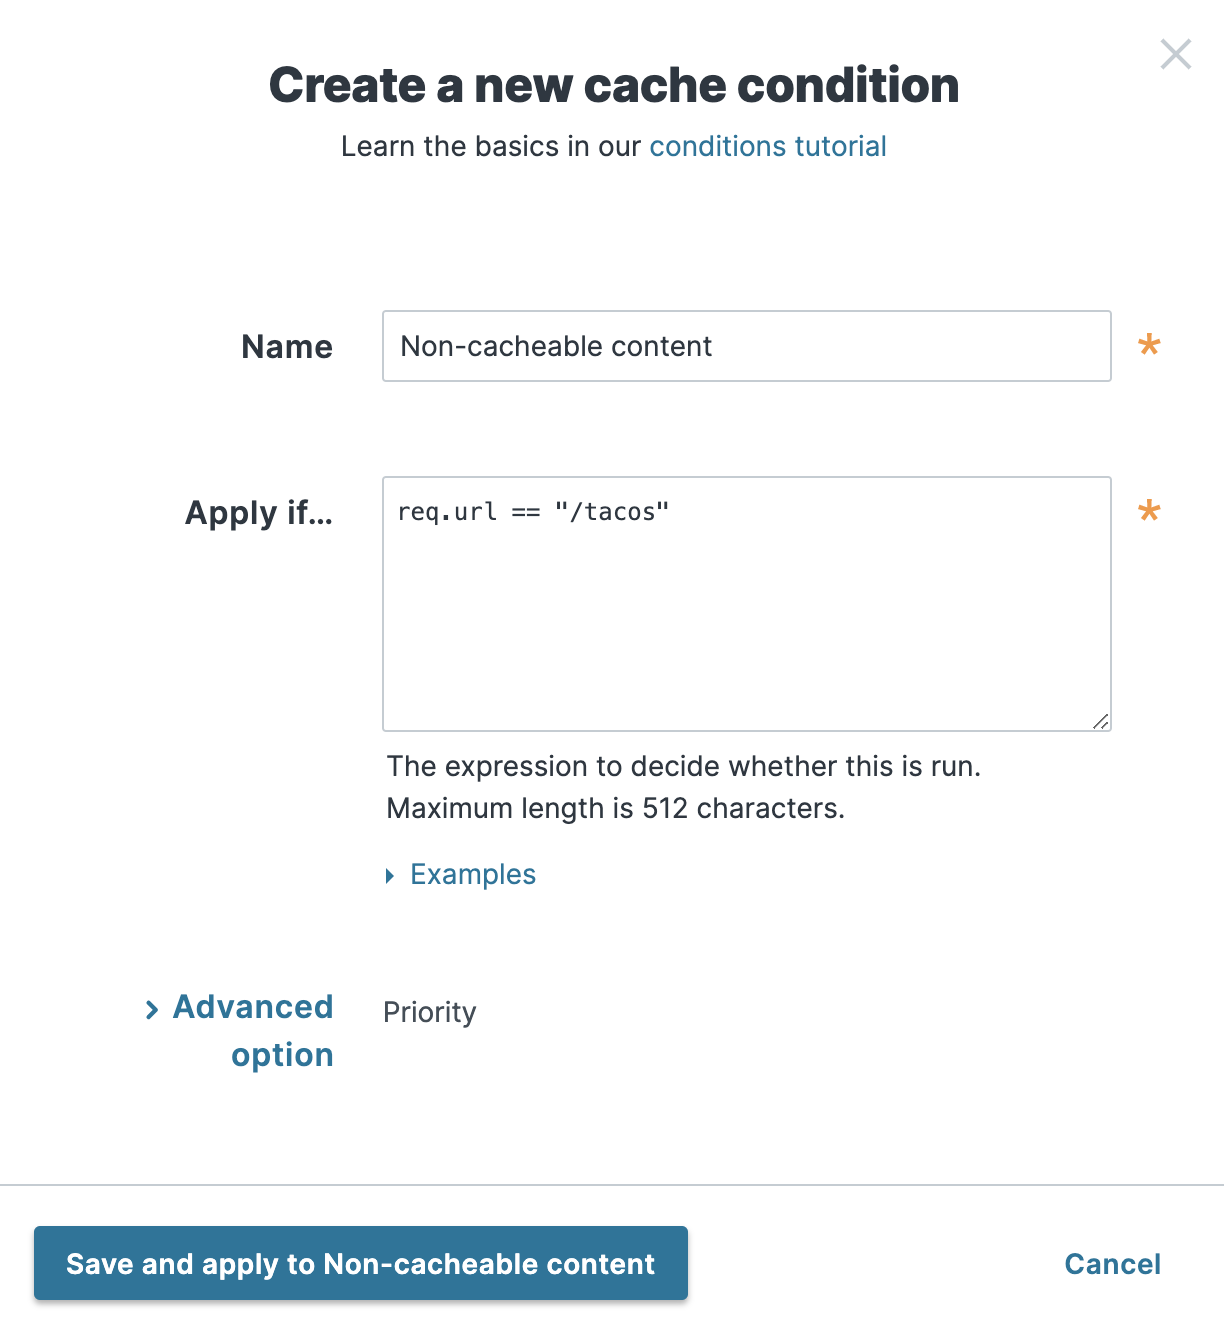
Click Create to create the cache setting, and then click Attach a condition. Fill out the fields as shown below. The condition works by looking at a VCL variable called req.url. If the variable is set to the path of the tacos recipe index page, the condition will apply the cache setting and pass the request without caching it.
TIP: You're about to use your first VCL variable — a big milestone. But what is VCL, and what are variables? Let's back up! The Fastly CDN is based on the open source Varnish software. Everything a Fastly service does is powered by Fastly's modified version of the Varnish Configuration Language (VCL). Believe it or not, throughout this tutorial, we've been using the Fastly web interface to modify the VCL code for our service. The web interface hides the complexity, but behind the scenes, it's been taking our settings and using them to generate custom VCL code that is used every time we activate our service configuration. That VCL code tells Fastly when and how to cache objects on our website. We're at the point in this tutorial where we need to start writing bits of custom VCL code to implement advanced logic in our service configuration. You can learn more about VCL in our documentation and try it out using Fastly Fiddle.

Click Save and apply to Non-cacheable content. Then we'll select Activate on Production from the Activate menu to activate our service configuration. After performing another purge all (follow the instructions from the previous section), our new cache setting and condition should be live. We can check by using the following curl command:
$ curl -svo /dev/null -H "Fastly-Debug:1" https://tacolabs.global.ssl.fastly.net/tacos/The output should look like this:
< HTTP/2 200< x-amz-id-2: lSWEBpWjnJqWvUpaCYRGHcJcnau/qMIlnu1ranRqgRgGB+O6Tj+EPURc6mx6Uxf7/n1YFt7bNJc=< x-amz-request-id: F46TZ9RP94DM9SFW< last-modified: Fri, 23 Jul 2021 21:54:38 GMT< etag: "9f61cab2ab8c1347259ac814ff3068c9"< content-type: text/html< server: AmazonS3< accept-ranges: bytes< via: 1.1 varnish, 1.1 varnish< cache-control: no-store, max-age=0< date: Fri, 29 Oct 2021 20:54:33 GMT< x-served-by: cache-mdw17349-MDW, cache-bur17526-BUR< x-cache: MISS, MISS< x-cache-hits: 0, 0< x-timer: S1635540873.002019,VS0,VE154< vary: Accept-Encoding< strict-transport-security: max-age=300< content-length: 2807It looks about the same as the previous output, right? But watch the x-cache and x-cache-hits headers — those don't change on repeated executions of the curl command. If the page was being cached, we'd see a HIT in the x-cache header.