
Serving challenges with interstitial pages
Client challenges can be served on an interstitial page or embedded within a page of your web application. With the interstitial page presentation method, client challenge management remains in the control panel you use to access the Next-Gen WAF. It is the only presentation method that supports all challenge types.
HINT: Have a React or single-page application? Embed a dynamic challenge within your web application. React and single-page applications don't handle interstitial pages well.
Prerequisites
Before you add a client challenge, you must enable client challenges on the service where you intend to use them.
Adding challenges
To serve a challenge on an interstitial page, complete the following steps:
- Next-Gen WAF control panel
- Fastly control panel
- Log in to the Next-Gen WAF control panel.
- From the Sites menu, select a site if you have more than one site.
From the Rules menu, select Site Rules.
Click Add site rule.
In the Type area, select Request or Rate limit. For information about each rule type, check out our Working with request rules and Working with advanced rate limiting rules guides.
In the Conditions area, define where the rule should send the challenge. For example, to send a challenge to all request traffic destined for
www.example.com/login, create the following conditions:Condition Field Operator Value 1 Method Equals GET 2 Domain Equals www.example.com3 Path Equals /login(Optional) In the Conditions area, add conditions to restrict when the rule should send the challenge. For example, if you don't want to send challenges to requests with the
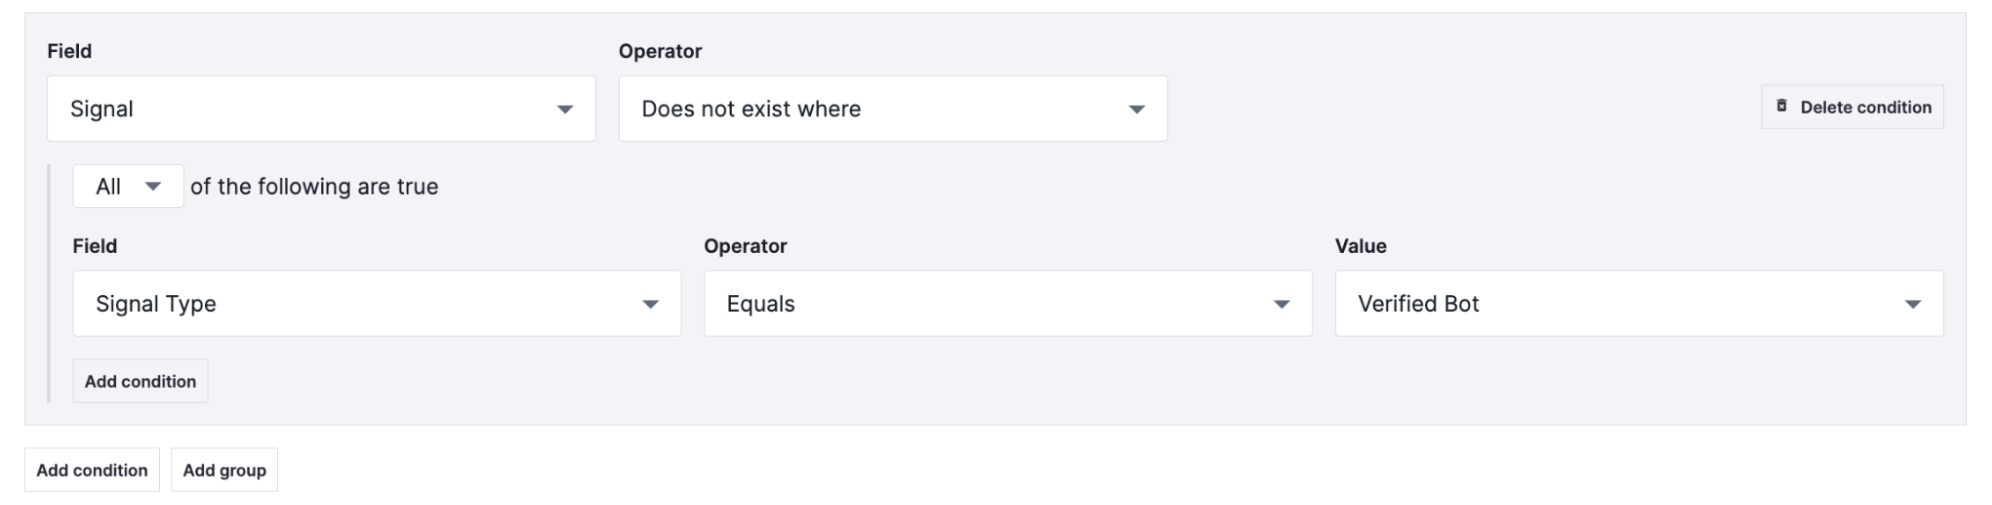
VERIFIED-BOTsignal, add the following condition:- From the first Field menu, select Signal.
- From the first Operator menu, select Does not exist where.
- Select All to specify that a request must meet every condition.
- From the second Field menu, select Signal Type.
- From the second Operator menu, select Equals.
- From the Value menu, select Verified Bot.
In the Next-Gen WAF control panel, the settings would appear like this:
In the Actions area, define the type of challenge the rule should send.
Challenge type Actions area Dynamic challenge From the Action type menu, select Dynamic challenge. Non-interactive challenge From the Action type menu, select Browser challenge and leave the Allow Interactive switch disabled. Non-interactive challenge From the Action type menu, select Browser challenge and enable the Allow Interactive switch. Fill out the fields in the Details area as follows:
- In the Description field, enter a description for the rule.
- Leave the Status switch for the rule enabled.
Click Create site rule.
After adding a challenge, you can optionally:
- Add a custom logo to the interstitial page where the challenge is served.
- Set up rules to block requests from clients that failed a challenge.
Adding custom logos
Challenges support displaying a custom logo allowing you to customize challenge pages with your own branding instead of the default Fastly logo. They automatically attempt to load a custom logo from the path:
/fastly/logoThis path does not need to physically exist and can be handled via a URL rewrite. The challenge container adjusts the logo’s size automatically, with the default image size being approximately 300x300 pixels. If the path fails to load, the challenge will fall back to the default Fastly logo.
To provide a custom logo, add the following VCL snippet in the vcl_recv subroutine. This example rewrites /fastly/logo to load an image from your origin:
# Redirect custom logo requests to the correct path on the customer originif (req.url ~ "/fastly/logo") { set req.url = "/static-assets/challenge-robot.jpg";}Be sure to replace "/static-assets/challenge-robot.jpg" with the actual logo URL on your origin.
